Tuesday, November 27, 2012

Warm Wishes

A warm cup of rich hot chocolate is a favorite treat around here, especially after coming in from a day of skiing, hiking or playing in the snow.  We had a light snow this morning, so I was inspired to create this card. I used my Fiskar's Scrap Boss and embossed the cup image then fussy cut around it. I colored it with markers and colored pencils, added the snowflakes and used poly fil to create the steam. To make the candy cane, I cut a piece of white cardstock into a strip and added detail with a red marker and colored pencils. I slipped it into the cocoa by cutting a small slit with an Xacto.   The sentiment was printed with MS Word before attaching the brackets.  I added white cardstock to the red brackets to repeat the candy cane pattern.  I also used the red and white twine for the same reason.
Supplies:
Cup: Fiskars Scrapboss
Cardstock: Fox River Papr Co.
Cardbase: Paper Studio
Bracket punch: McGill
Snowflake Punch:Tonic Stuidos
Candy cane: handmade
Twine: The Twinery Maraschino
Markers: Impress Dual Marker Teal

Sunset


This is my latest post for Kathy's Waffle Sketch File. I'm a new member of the design team there. Have you stopped by yet?  If not, I encourage you to do so. A new sketch goes up on the first Tuesday of the month and  new projects are added as the month progresses.The challenges are "anything goes" so the possibilities are endless. My layout is based on the November sketch.

About the Layout:
Sunsets are pretty amazing at my house but I don't always get a photo. Fortunately, I was able to snap a few photos of this one.  This was a fun layout to create. I started by cutting my photo into fourths and mounting it on black cardstock. Then I layered it on the bottom of a piece of light green cardstock.  (The green cardstock looks white in my photo. I just couldn't get a decent photo of it.)  I mounted the second photo of black cardstock and adhered it to the top of the green panel. For the background,  I chalked in some clouds on a piece of black cardstock. Next I cut the orange strip with decorative scissors, added a ribbon and strip of black cardstock and adhered the green panel and this strip to the background.  I adhered tiny circles around the edges of the green cardstock as well. For the title, I hand cut the letters and adhered them above the top photo. I added vertical strips of the orange patterned paper and a few brads to the lower right hand portion of the green cardstock and finished by adding a journaling tag and ribbon.

Supplies: Cardstock: Paper Recollections, Patterned paper...sorry don't know the source, Ribbon: Offray, Die cut tag: Fiskars Fuse, Brads: Making Memories, Chalk: Craft T Products, Adhesive: Scotch Advanced Tape Glider

Sunday, November 25, 2012

Stockings Were Hung

Do you hang stockings? It is a Christmas tradition at my house. My son loves to open the small gifts in the stocking after we've finished opening everything else. Our stockings look nothing the ones on this card, but I couldn't resist using up some of my scrap pieces of patterned paper. I started by hand cutting the stockings and then used poly fill to top them off.  I added faux stitching and detail with colored pencils. Before adhering them to the card, I  printed the sentiment with a MS Word document and added a strip of green cardstock on each side of the sentiment.  This was a pretty fast and simple card to create.

Supplies:
Cardbase: Paper Studio
Polyfil
Patterned paper: Oriental Trading
MS Word
Colored Pencils: Crayola
Green Cardstock: from my scrap stash
Adhesive: Scrapbook Adhesives Crafty Foam Tape

Quilted Thank You

I recently purchased a hexagon punch. I love this new punch! It helped pull this card together very quickly.  After punching a series of hexagons and adhering them to a piece of black cardstock, I trimmed the black cardstock down to fit onto a cardbase and added the faux stitching with a gel pen. I also wrote the sentiment with the same gel pen.

Supplies:
Cardbase: Paper Studios
Cardstock: Paper Studios
Patterned Paper: Fancy Pants Be You
Solid paper: scrap pieces from my stash
Pearls: E Line Pearl Crystals
Gel Pen: Sakura
Punch: Emagination

You're the Best!

A sketch from Clean and Simple Stamping was the inspiration for this card. I ended up rotating the sketch and used a soft color palette.

Supplies:
Cardbase: Paper Studios
Patterned Paper: Fancy Pants, Be You
Punches: EK Success: circles, Marvy Uchida: Flower
Pearls: E Line Pearl Crystals
Twine: The Twinery
Adhesive: Scotch Advanced Tape Glider, Scotch Quick Dry

Saturday, November 24, 2012

Season's Greetings

This card was inspired by the Glamour & Glitz challenge over at Simply Less is More.  My handmade ornament was cut from glittered paper. I added metallic trim, gems and a few bands of glitter.

Supplies:
Cardbase: DCWV
Cardstock: green: scrap pieces, red: MME I Believe
Punch: Ek Success Tree, Letters: Oriental Trading Punches
Trim: Offray
Metallic Paper ?
Gems: Studio G
Glitter: Gary M Burlin & Co
Adhesive: Scapbook Adhesives Crafty Foam Tape, Scotch Quick Dry

Framed Wreath


After counting the Christmas cards that I've already completed for mailing this season (fifty already), I realized I was short three. So, I made this one thinking it would be quick.  In reality, the wreath itself took far longer than I planned. All the little branches were punched and each time I punched, the punch would get stuck. I persisted and glued each down on a cardstock ring and then added the bow before adhering it to the cardbase.  I used a die to cut the frame and adhered it with dimensional tape.  I toyed around with the idea of adding the sentiment at the bottom, but put it inside so I could keep the clean and simple look.

This is the first year in over 15 years that all of our card recipients are not receiving the same card design. I have had a great time creating many different designs and it was equally fun trying to figure out who would get which card. My husband and son helped with this part. I enjoyed hearing  their reasons for selecting each card.  I've learned that they both truly appreciate the cards that are CAS.
Supplies:
Cardbase: DCWV
Cardstock frame: DCWV, Fiskars Fuse die # 0081 scalloped square
Wreath: scrap pieces of green cardstock, EK Success Tree punch
Ribbon: Offray
Adhesive: Scotch Advanced Tape Glider, Scotch Quick Dry, Scrapbook Adhesives Crafty Foam Tape

Thursday, November 22, 2012

Dashing through the Snowfakes

I'm playing along with the 10 Minute Craft Dash over at Pretty Pink Posh. The colors are Kraft, Navy Blue and Sky Blue.  I am also submitting this card for the sketch challenge at Skipping Stones Designs.  This card was completed under 10 minutes. In fact here's what my stop watch read:  7:45:10
I love the challenge of the 10 minute dash!!!
 
Supplies:
Cardbase: Kraft Paper Studios
Cardstock: DCWV: Sky Blue, Fox River Paper Co: Navy Blue
Ribbon: Paperbilities: Raffia Ribbon
Die Cut Snowflake: Fiskars Fuse(die cut and Letterpress)
Snowflake Punch: Emaginations
Adhesive: Scotch Advanced Tape Glider, Scotch Quick Dry

Wednesday, November 21, 2012

Retirement Party Placemats

I created these placemats from the pages of old books that were discarded.  The placemats will be used at a retirement party for the local library director. Since she is a librarian, I decided to upcycle old discarded books. All the image are from the old discarded books. The letters for each word were hand cut from the pages with text. Each placemat has photos, a word cut from text, a map and flowers.  I don't usually like to do collage projects. I find that they can be over crowded and too busy, so I tried to keep these placemats pretty simple and stuck with the same design elements for each placemat.  Since I need about 100 of these for the party, I will use a color photo copier and make copies as needed.

Add caption


Sunday, November 18, 2012

Sliding By

I created this card after being inspired by the challenge at Jingle Belles. The challenge is to create a card with some Christmas food on it.  My card has a gingerbread man sliding on a candy cane sled.  I hand cut all the images and used markers and a gel pen to add detail. For the scarf, I cut a scarf shape and cover it with twine.  The snow is poly fiber fill. I created the cloud background with chalk.  Inside the sentiment reads: Sliding by with Sweet Holiday Wishes.

Supplies:
Cardbase: Paper Studios
Cardstock: DCWV, Paper Studios
Gel Pen: Sakura
Markers: Zig Memory System
Colored Pencils: Crayola
Adhesive: Scotch Advanced Tape Glider
Twine: The Twinery
Chalk: Craft T Products.
Polyfil

Saturday, November 17, 2012

Found HARDWARE

When I saw that the challenge over at  Simply Less is More was HARDWARE, I knew I had to use these metal shapes that I had found while walking in the neighborhood. I have no idea what they were originally used for, but knew that they were keepers. So, I added eyelets, brads and wire to make them look like insects and finished the panel by stitching around the outer edge of the square with wire.
So glad you stopped by!

Wednesday, November 14, 2012

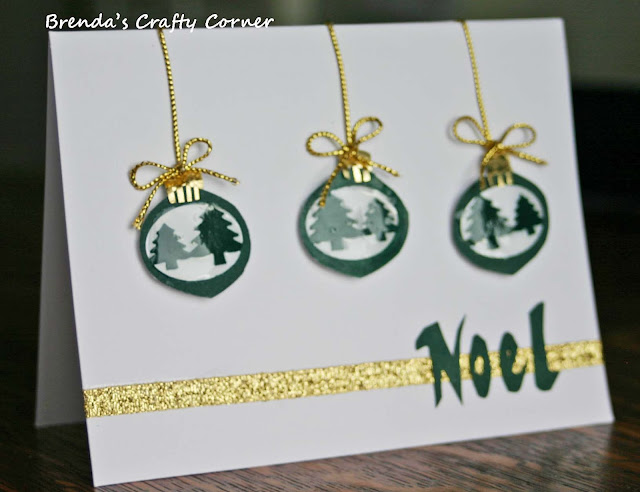
Noel

I woke up this morning with this card design swimming around in my head.  The ornaments were made from a tree punch and green cardstock. I punched them, then punched around the trees with an oval punch (see photos below). Next, I adhered the ornaments to a piece of white cardstock and used Diamond Glaze over the top of the trees and white space.  This added a bit of dimension. I cut a small "hanger" from metallic paper and hung the ornaments with metallic thread. The horizontal ribbon is also metallic.  For the sentiment I wrote the word Noel, then cut it out.

Step 1: Punch the tree shape from green cardstock.

Step 2: Use an oval punch to cut close to the edge of one side of the punched trees.
Step 4: Repeat on the second edge. Hint: To hold the shape as you slide it into the oval punch, temporarily attach it to a long strip of cardstock and slide it into the punch.

Supplies:  Cardbase: DCWV, Cardstock: scrap pieces of green, Ribbon & Twine: Offray, Gold metallic paper, Adhesive: Advanced Tape Glider, Punches: EK Success Paper Shapers, All Night Media,  Judi Kins: Diamond Glaze

Holly ~ Wishing You A Merry Christmas

This card is based on the sketch over at Retro Sketches.  I ended up using bits of scrap paper to complete it.  Inside the sentiment is simply "Wishing You a Merry Christmas".

SUPPLIES:
Cardbase: Paper Studios
Patterned paper & cardstock:  ? from my scrap stash
Holly Punch:  Emagination
Punch: Martha Stewart Doily Lace
Crystals: E Line Pearl Crystals
Ribbon: Effray
Colored Pencil: Crayola
Adhesive: Scotch Advanced Tape Glider
Metallic Twine ?

Tuesday, November 13, 2012

Exciting News!


Last week I had the most pleasant surprise. Kathy over at Kathy's Waffle Sketch File invited me to join her design team! I have eagerly accepted and feel so honored.  If you haven't visited her blog, I encourage you to do so.  A new sketch goes up on the first Tuesday of the month and  new projects are added as the month progresses. The challenges are "anything goes" so the possibilities are endless. Here is the current sketch:

Isn't it a fun sketch! I hope you will be inspired and will link up your project over at Kathy's Waffle Sketch File.   As you can see, I was inspired and created a few cards.  The sketch proved to be perfect for using up smaller scraps of papers and cardstock.


Merry Christmas Card Supplies:
Cardbase: Die Cuts With a View
Patterned Paper: My Minds Eye
Cardstock: Paper Studios,black, Fancy Pants Designs: Time for Spring
Ornaments: Handcut
Trim: sorry, don't know the source
Adhesive: Scotch Advanced Tape Glider
Vellum: a piece from my scrap stash

Peace & Joy Supplies:
Cardbase: Paper Studios
Cardstock: Core'dinations: Vintage, scrap pieces of green, Paper Studios,white
Holly Punch: EK Success
Colored pencils: Crayola
Twine: The Twinery, maraschino
Font: MS Word
Adhesive: Scotch Advanced Tape Glider

Hello, Dragonfly Card Supplies:
Cardbase: Paper Studios
Cardstock, paper: ColorBok
Large Dragonfly: Handmade from Vellum, scrap piece of orange cardstock, Crystal Affects, Studio G Black pigment ink
Small Dragonflies: EK Success Punch
Sentiment: Handmade, orange cardstock, Judi Kins: Diamond Glaze, Studio G black ink
Adhesive: Scotch Advanced Tape Glider


Monday, November 12, 2012

Merry Christmas Wreath


This card is based on a Mojo Monday sketch. I tried desperately to get a photo that I was happy with, but I struggle with cards that are mostly white like this one.  Anyway, I began by making the wreath with a snowflake punch and green cardstock.  Then I used a scrap piece of white cardstock, ran  it through the crimper and scalloped the edge.  I chalked around the edge of the crimped panel, added the twine, a red mat and the wreath.  I wrote Merry Christmas, repeatedly across the strip of green cardstock, then layered the white crimped panel on this.

Supplies:  
Cardbase: Paper Stuidos
Cardstock: Bazzill 
Punches: Snowflake: Emagination, Scallop: Stampin' Up, Bow: McGill
Twine: Horizon Baker's String
Crimper: Marvu Uchida
Adhesive: Scotch Advanced Tape Glider, Elmer's Glue Spots
Chalk: Decorative Chalks
Gel Pen: Sakura


Merry Christmas (trees)


I created this card for the sketch challenge at CAS(E) this Sketch!   I punched the trees from scrap pieces of green cardstock, crimped the white cardstock and wrote my sentiment with a gel pen.  I also used my sewing machine (without thread) to stitch around the outside edges of the sentiment panel.

Supplies:
Cardbase/ crimped panel:  Paper Studio
Trees/Sentiment cardstock: Scrap pieces from my stash
Tree Punch: All Night Media
Crimper: Marvy Uchida
Gel Pen: Sakura
Adhesive: Scotch Advanced Tape Glider

Have a fabulous week!

Sunday, November 11, 2012

Thunderbirds & Makeshift Hats

I based this layout on a sketch over at Sketches With A Twist.  The twist part of the challenge was to use a rubber stamp.  I used the Zig Zag Star Border stamp around the edges of my layout.
The layout is about a Thunderbird's air show that my son and I attended. We had to travel to get there and when we arrived, we realized we'd forgotten our hats.  So, we decided to create hats from things we found in the car.  He used the hood of a rain jacket and I folded an old map into a hat.  I have to say, I got a lot of strange looks, but I was happy that I was able to see airplanes without too much squinting.

Supplies:
Cardstock: Core'dinations Vintage Collection
Star Punch: McGill
Paper: Provo Craft Color Wheel Collection: Ocean Blue, Recollections: red, black
Stamps: Hero Arts Zig Zag Star Border
Pigment ink: Studio G white
Adhesive: Scotch Advanced Tape Glider,  Scotch Quick Dry Adhesive
Airplanes: hand cut
All words are hand cut from black cardstock

Saturday, November 10, 2012

Orange, orange, orange!

The CASology challenge this week is ORANGE. This is my second card for the challenge. I started by wrapping orange twine around three pieces of water color paper. Then I punched the flowers and adhered them to the postage stamp shapes. For the center of each flower, I added a small circle and then staggered and  adhered the strips onto the orange cardbase.
Supplies:
Cardbase: Die Cuts With a View
Cardstock: Daler & Rowney Watercolour Pad
Punches: Ek Success, Flower/Postage Stamp, Dien Wan, circle
Twine: The Twinery, Mandarin
Adhesive: Scotch ATG, Scotch Quick Dry
THANKS FOR STOPPING BY!


Friday, November 9, 2012

Shades of Purple Thanks

I saw a sketch challenge earlier this week and really wanted to play with it.  I let the ideas mull around awhile and came up with this card.  It is based on a sketch challenge over at Skipping Stones Designs. I began by creating the flowers from purple gems and embroidery thread. As I created them I attached them to the hexagon shapes.  (The tags originally were used at a library to tag non circulating items.) Next I cut the purple circle and adhered the flower tags and twine to it.  I cut a slightly larger circle from water color paper and used it as a card base.  I added the twine around the perimeter of the circle along with tiny holes that I made with a needle.  Using the water color paper, I cut a tag, wrote the sentiment with a marker and added the wrapped twine and a bow.  I finished by adding tiny purple dots around the perimeter of the tag and the hexagons.
Supplies:
Card base: Daler, Rowney WaterColour Pad
Cardstock: K&Co Specialty Paper
Hexagons: recycled library tags
Gems: Studio G, E. Pearls & Crystals
Twine: The Twinery, Lilac
Adhesive: Scotch Advanced Tape Glider
Needle: Singer
Embroidery Thread: DMC


THANK YOU SO MUCH FOR VISITING!

Candy Cane Wishes

I was very eager to create this card for the " SO TORN" challenge at CAS-ual Fridays.  This was such a fun and simple card to make. I started by tearing the red stripes and adhering them to water color paper in the shape of a candy cane. I  matted this on the same red as the torn stripes and attached it to a the card base.  To give it a bit more color,  I added  the torn holly and berries and finished by writing the sentiment on a torn piece of water color paper.

Suppplies:
Card base  and mat: Daler, Rowney Water Colour Pad
Paper: Paper Collections (red and green)
Gel Pen: Sakura
Marker: Zig Memory System
Adhesive: Scotch ATG, Elmer's Glue Spots
Thanks for stopping by! 


Thursday, November 8, 2012

For a Friend

I made this card for a friend's birthday. Admittedly, I have a rather large assortment of homemade cards, but as I looked through all of them, I couldn't find one that I thought was just right for her.   Instead, I created this card. I knew she would like the colors and the flowers. Do you do this?  Do you have a stash of homemade cards to choose from, yet you create a new one instead?  

Since I used orange flowers and an orange ribbon, I decided to submit this card for the ORANGE challenge over at Casology.


Supplies:
Card base: DCWV
Ribbon: OT Sheer
Die Cut: Fiskars Fuse
Colored Pencil: Crayola
Pigment Ink: Page Craft Amber
Flower Punch: EK Success
Handheld flower punch (?)
Adhesive: Scotch ATG