Saturday, November 19, 2016

Changing Things Up

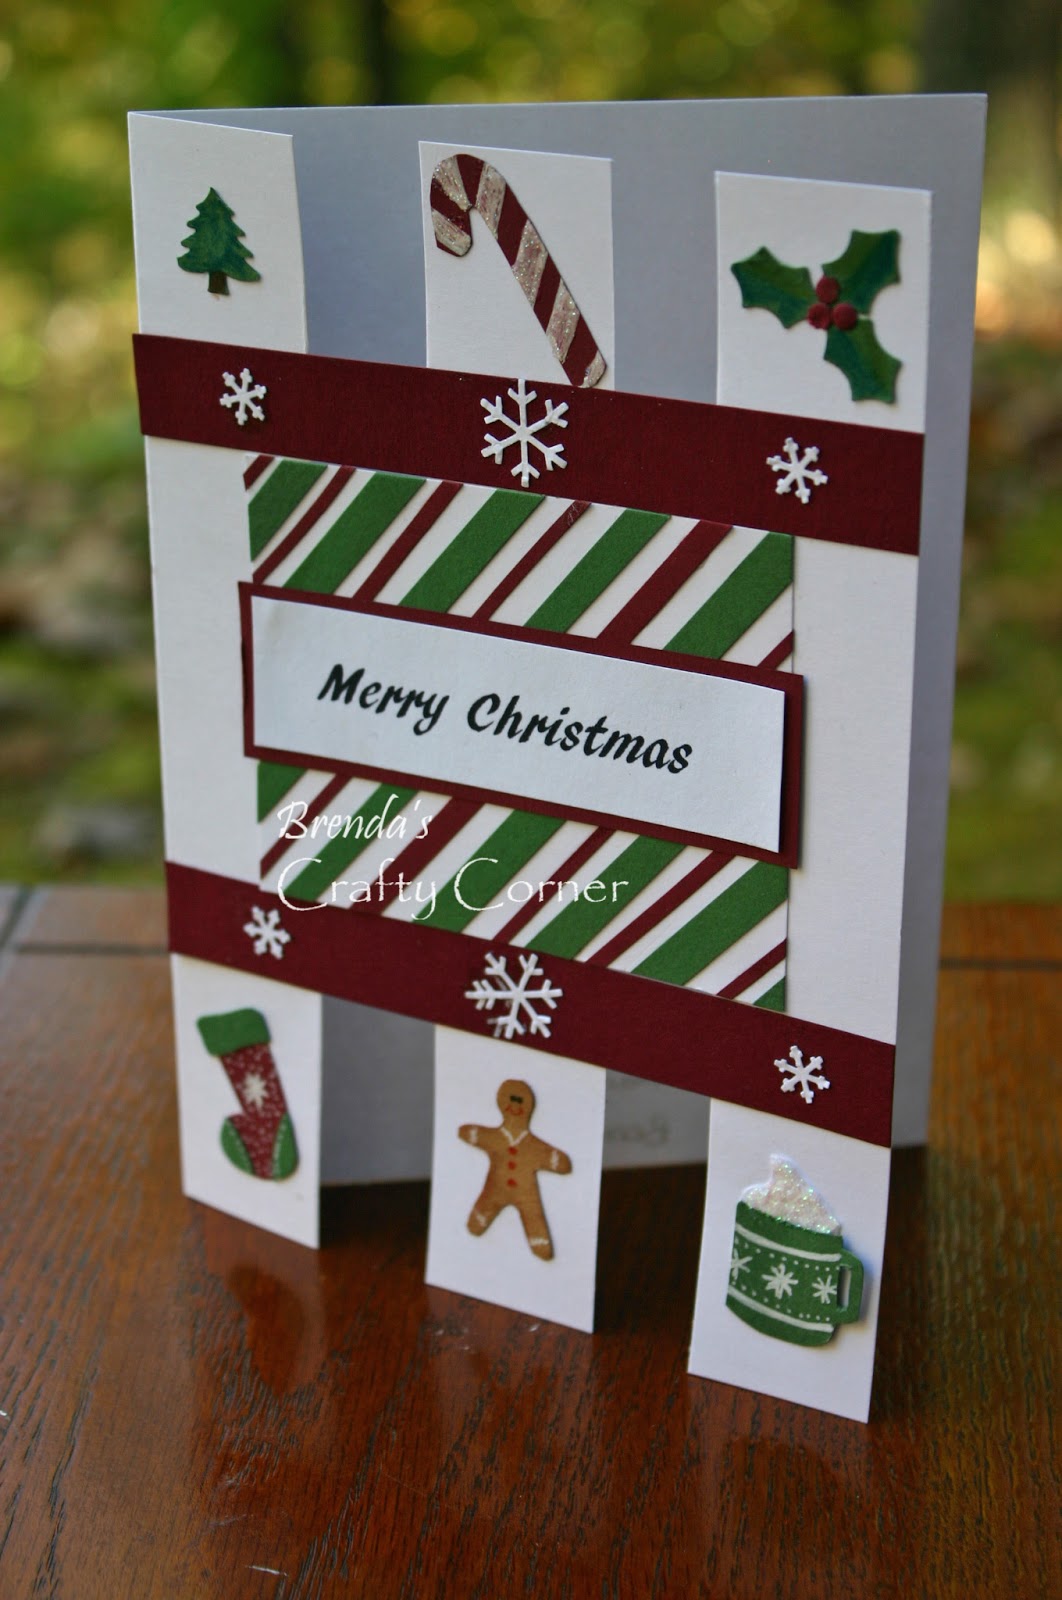
When I sat down to make this card, I decided it was time to change things up a bit. I wanted this card to be unique. So, I cut the front panel of the cardbase into strips. I then put the strips back together by adhering them to the striped cardstock. To create the striped cardstock, I added strips of maroon and green cardstock to a white cardstock base. I handcut and decorated the candy cane, stocking, mug of cocoa and added punched embellishments that included the holly, snowflake and tree.

HOPE YOU ARE ENJOYING THE WEEKEND! THANKS FOR STOPPING BY!

Gingerbread Man with a Hat

This card definitely ended up looking a lot different from what I had intended. I started by handcutting a gingerbread man. I wanted to make him a bit smaller than the gingerbread man I had created for my previous card and I think I succeeded. However, this little gingerbread man seemed a bit lost on the very colorful patterned paper. To make him pop just a bit more, I added the hat and layered the sentiment over top of him. It is hard to tell because the front panel is so larger, but this card is also a Z fold card.

Plump Gingerbread Man

Here I am creating yet another Z fold card! I think I really like this card folding technique because I keep coming back to it. However,  as I mentioned in a previous post, I am trying to use some supplies from my stash that I haven't used in a while, so this card features rick rack, brads and twine. My plump gingerbread man is handcut with inked edges and painted facial features.

Gingerbread Man on Washi

I recently decided to pull out some supplies from my stash that I haven't used in a while. I go through stages where I seem to use the same products over and over so I wanted to change things up a bit. My goal for this card was to use Washi tape. I handcut a gingerbread man, added some ink around the edges and used white and red paint to create the icing detail and buttons. Hmmmm, now as I look at the photo of the card, I'm feeling that my gingerbread seems a bit bald. Maybe I should have added a hat.

Candy Canes

At first glance you might be thinking that I have created another Z fold card. but look more closely. This card is simply a 5" x 7" card with 2.5" of the front panel removed. I've used a dry embossed oval and adhered it to the right side of the back panel to create a flap that opens.  I cut the candy canes from maroon cardstock and used paint to add the stripes. On the left edge of the card, I added a punched border and the red and white twine.

Snowflake on Green

Here's another Z fold card. I've dry embossed the white panels with a snowflake pattern and continued the snowflake theme by adding the large die cut snowflake to the front panel. I added two layers to the large snowflake and used 3-D adhesive between them. I've written the sentiment with glitter glue and added glitter to the large snowflake on the front and to the snowflake next to the sentiment. I love the contrast between the green and white and the clean, simple feel of this card.

Santa Hat on a Z Fold

It is incredible to think that we are already more than half way through November.  It is our first Autumn in our current home and we have enjoyed seeing the glorious color here in Virginia. It is so very different from the fall color and weather we experienced in Wyoming during the past last eleven years.

Today I am sharing another Christmas card with a  Z fold. I ended up using a monochromatic theme. I handcut the Santa hat and used a bit of chalk to add the detail to make it look like the fabric of the hat had a few folds. Behind the front Z panel, I've added white cardstock to give plenty of space to write a message and personalize the card.


Thanks so much for visiting! Have a fun and creative weekend!

Tuesday, November 15, 2016

Side Step Cards

As you can see, I've created a series of cards using the side step pattern. I have created these cards over several weeks but decided to post all of them together as they share the same card folding technique. It's a fun technique with loads of possibilities. The card with the deer is really dark blue, but for some reason I couldn't get a decent photo of it. 

Layer upon Layer


Are you looking for inspiration?  If so, please visit us at The Sketch File. Kathy and I would love to see what you create with our November sketch. You can use the sketch as is or shrink it, enlarge it or rotate it. I've chosen to use the layers as a flap on the front of this card. Can you still see the sketch on this card?

Saturday, November 12, 2016

Holly & Holly Berries

Do you have a favorite punch that you use over and over again? My holly leaf punch is among my favorite punches. I use it repeatedly when creating Christmas cards and love how a little bit of chalk and a dry embossed line down the center make the leaf look more realistic.

Three Ornaments

I love the combination of white and dark red/maroon. To me it is an elegant combination and that was what I was trying to accomplish with this card. I die cut the three ornaments and added silver embroidery thread to make the ornaments look like they are hanging. I dry embossed the front white panels and added a computer generated sentiment.  On my computer screen the sentiment looks like it was matted on a brighter red cardstock, but it is really the same cardstock as the card base.
THANKS FOR STOPPING BY!

Thursday, November 10, 2016

Four Trees on the Diagonal


I have been trying to come up with alternatives to the basic 5"x 7" card base. So for this card, I folded the sides to of the front panel to the center and cut away a portion of the card base at a diagonal. I then used scraps of  patterned paper and cut four trees (all the same size).  I matted the trees and used them to attach the diagonal panels on the front of the card.  I like that this card looks very different from the other 5" x 7" cards that I have been creating. 

Dangling Snowflakes

I'm sharing a Z fold card. I've used this pattern to create other Christmas cards already, but here I decided to dangle a few snowflakes from the strip of the blue cardstock. I used patterned snowflake paper for the background. I doubled each snowflake sandwiching embroidery thread between each and attached the thread to the blue strip at the top of the card. It's a pretty simple card (hhhmmmm, maybe that's why I like it).

Tuesday, November 8, 2016

Hat & Mittens @ The Sketch File


It's Tuesday and time to share another card based on the November sketch. I hope you can find some time to play along with us over at The Sketch File. Our sketch will be around for the entire month of November and we'd love to see what you can create with it. I decided to create a set of hat and mittens and use them as the focal point. I ended up handwriting my sentiment, but will probably change it out and print the sentiment with MS Word. The white gel pen that I used just doesn't allow the words to pop enough.  Here's our sketch (two versions of it):


Monday, November 7, 2016

Silver Jingle Bell

Good morning. I have been working like a crazy person trying to catch on my Christmas cards. It has paid off and now I am slowly getting around to sharing them. This card came together from bits and pieces that I had on my work surface.The snowflakes and corrugated cardstock were extras from previous projects. I layered the corrugated cardstock on maroon and then added a few maroon snowflakes. I die cut the silver jingle bell and used the maroon strips to add a border.

Thank you for stopping by. I hope you don't get tired of looking at Christmas cards!

Sunday, November 6, 2016

GLITTERED TREE

As I was searching through my paper stash, I ran across the tree patterned paper used on the background on this card. I was inspired by the trees and ended up creating a similar tree on a piece of green cardstock. I used glitter glue to draw a larger version of the tree and used it as the focal point of the card.

Holly with Red and White Striped Background

I've created a very bright Christmas card. I started by using a punch to create the holly for each of the panels on the front of this card. I scored each holly leaf and then used dark green chalk to add detail to each of the leaves. The berries started with punched red circles and then I used a white gel pen to add the white highlights. I added strips of white cardstock to the red cardbase to break up the red. I think the addition of the white stripes really helped to pull the card elements together.

MAROON JINGLE BELLS

I love the patterned paper that I have used on this card. I find the soft green color and the combination of hearts, stars and leaves so very appealing. It was exactly what I needed to inspire this Christmas card. I simply added the die cut jingle bells and a computer generated sentiment.

Stamped Tree on Z Folded Card

I am back again with a Z Fold Card. I have used this design before and love it. I also decided that I needed to break away from my current Christmas patterned paper. I feel like I use the same papers over and over again, so I was ready for a change. Since the plaid patterned paper has a bit of red and green, I thought it would work for a background paper on this card. I simply stamped the tree image on white cardstock and matted it on a panel that I adhered to the front of the card. I used a small piece of cardstock to print my sentiment and attached it to the inside panel.

Saturday, November 5, 2016

Warm Winter Wishes w/ Green Mittens

Several months ago I cut out the mittens that I have used for this card. At the time, I was unhappy with the mittens and found that they just didn't work for the project I had been working on so I set them aside. When I was going though my stash of shapes that I have previously cut and set aside, I rediscovered them and finally decided to use them. I ended up scoring the upper part of the mitten, the part that would cover the wrist. I wanted it to look more like a cabled knit stitch. I used a snowflake punch to create a snowflake pattern on each mitten and tied a bit of twine around each before matting them on white dry embossed cardstock. Inside the card is a sentiment that says "sending warm winter wishes".  

Poinsettia on Split front Panel


I'm back with another Christmas card and I'm using a split front panel once again. Since I don't have a punch for a poinsettia, I used a circle punch to create the petals. I punched a half circle, rotated the half circle and punched again so that I ended up with the petal shapes. I scored each petal in the center and slightly folded them. I created the flower center from a series of  1/4" flower punches and layered the flower on punched leaves.

Red & White Snowflake Card

I have been working endlessly on the weekends to create Christmas cards and I love it when I sit down and inspiration hits and the card comes together quickly (which is what happened when I made this card). I began by dry embossing the white snowflake background and then used punched maroon snowflakes on top of the panel. I used a word document to print my sentiment and added a bit of twine for an accent.

Snowflakes on Split Front Panel

I am sharing another Christmas card and this one has a split or space in the front panel. I covered each part of the front panel with a multi patterned background which I recycled from the cover of a pad of paper. Since the pattern has a lot  maroon in it, I punched maroon snowflakes and used them to attached the two pieces of the front panel. I like the design of the card base and how quickly the card came together so I know I will be creating similar projects. Thanks for stopping by and taking a peak at my card!

Thursday, November 3, 2016

Jingle Bell Card


Yesterday I posted a Christmas card with the same type of fold that I used on today's card. Once folded there are five panels. I kept the card clean and simple and only added embellishments to three of the five panels. I added hanging jingle bells to the center and  kept the largest jingle bell stationary with some 3D adhesive. The two smaller bells are hanging loosely. I can see myself using this folding technique again and again and it is easily accomplished. For a how to video go to  Debbie's Designs.

Thanks for stopping by and taking a peak at today's card!


Wednesday, November 2, 2016

November at The Sketch File


It's a new month which means that we are ready to introduce you to the new sketch at The Sketch File.  It's a fun sketch and it inspired me to create this Christmas card with a unique fold. I had seen the folding technique at Debbie's Designs. I was eager to try the folding technique and wanted to incorporate our current sketch. I hope you will take a few minutes to create a card or two with the sketch and share it with us.


Wednesday, October 26, 2016

Final Card for October Sketch

Tonight I'm sharing one final card based on the October Sketch at The Sketch File. Kathy has also posted a card to help inspire you. If you are feeling creative and want to play along with us, we'd love to see what you create with the sketch. Sorry for such a quick post, but I am exhausted. I've put in another very long day at work. Tomorrow will be another long day, so I've got to get plenty of rest.

Wednesday, October 19, 2016

October Sketch

Lately I feel like I can't take a decent photo. It is driving me crazy. I have tried in various parts of the house, outside and even in the car! I just can't seem to get the lighting right. So, I apologize for the photo, but hope it won't discourage you from taking a peek at this month's sketch and playing along with us at The Sketch File. I have adapted the sketch as you can see and Kathy and I encourage you to do so as well. I'm not sure you can tell from the photo, but I started with a 5"x7" card base and folded the front panel toward the fold at 2.5". I am loving this fold and have been creating several cards with this pattern.


Wednesday, October 12, 2016

October at The Sketch File

I am working like a crazy woman trying to get my Christmas cards done. I think I have about 55 out of 85 complete which isn't too bad at this point. This card is inspired by our October sketch at The Sketch File. Kathy and I hope you will join us and share a card or two.  As always the sketch will be up for the entire month.  I have folded this card a bit differently. I started with a 5"x7" card base and folded the front panel at 2.5". I attached the holly patterned paper to the front fold and added the details. I like this fold and will be revisiting it again and again. I hope you can still see the sketch in this card and I must apologize for the dark photo. I am always challenged when it comes to photographing a card that has a lot of white on it!

Tuesday, October 4, 2016

Introducing the OCTOBER SKETCH

It's time to introduce the newest sketch at The Sketch File. The October sketch will be available all month and we hope you will find time to create something based on the sketch. Kathy has provided a few versions of the sketch to encourage you to resize, rotate, flip, shrink, enlarge and generally have fun with the sketch.  

I have decided to focus on Christmas cards and I'm sharing this one with candy canes. I've used dry embossing for the snowflake background and used  a punch to create the boughs. The candy canes are handcut from red cardstock. I used paint to add the white stripes. After I had finished adhering all the bits and pieces, I regretted that I didn't make the candy canes larger and more of a focal point.