Monday, May 26, 2014

Tropical Paper Bag Mini

Do you love to create mini albums? I love to create them but often I make them for myself and am very slow about actually adding photos. This past year has been different. I have made eight different albums to be given as gifts. Two of the albums I made are paper bag "tropical" mini albums, each with a slightly different cover and slightly different inside pages. I am sharing both covers and the inside pages of just one of the albums. I created them both as gifts for two of my nieces. My inspiration came from Tracy at the The Paper Crafter's Library. She created a very similar album. Sadly, even though I was really eager to create may own tropical album I  couldn't bring myself to do.  When I purchased the Graphic 45 Tropical Traveloque paper collection it was sooooo gorgeous I didn't want to cut into any of the papers. I put it aside for a VERY long time (so long that I don't think the collection is available any longer and I think I saw Tracy's video in April of 2012!). Then I learned that one of my nieces would be living in the Caribbean and a second would be visiting her. So I just had to take the plunge and get creative with these gorgeous papers.   I hope you enjoy looking through the album. I am so glad I finally got around to doing them.
To create the netting used throughout the album, I used cheese cloth that I dyed brown with walnut ink.  I also dyed some white cord with the same walnut ink and incorporated a bit of twine on the tags and for the binding.
I used a hot glue got to attach the tiny shells. I hope that it holds the shells in place permanently!
 I also created protective sleeves for each page. I simply cut larger page protectors down to fit the page size of my album pages (about 7" x 9") and used my sewing machine to stitch the edges together.


I used embossing powder to create the sand on the inside of the front and back covers.
 I attached bands around the black mats on the inside pages, only adhering them to the back of the black mat so that photos can slide under the edge of the band.
I wanted to add some journaling cards with lines, so I used my computer and printer to create lined paper.
These albums were so fun to create and the best part is that I was able to give them as gifts. I can't wait to see the albums filled with photos taken by my nieces.

As I mentioned earlier, I was inspired to create this album after watching a video from The Paper Crafter's Library. If you haven't visited the The Paper Crafter's Blog, I encourage you to do so.  You will have free access to the blog, but will also have the option of becoming a paid member and you will have access to the most incredible source for crafting videos and tutorials!

Happy Crafting and THANKS for visiting!

Sunday, May 25, 2014

Peace on Earth Scene


I'm celebrating PEACE with Lauren & Steph over at Jingle Belles. They are suggesting that we use the PEACE symbol or the word PEACE on our cards. For this card, I created a snow scene on black cardstock. First I used torn paper to create snow, then  I added a full moon to the night sky along with a few chalked in clouds and stars that I created with a gel pen.  I cut the image in half to create two inchies and adhered them onto a snowflake embossed mat. I printed PEACE on Earth on white cardstock, cut it into a banner shape and adhered it below the snow scene.


Peace on Earth

It's time to celebrate PEACE. The very talented and creative ladies (Steph & Lauren) over at Jingle Belles are asking us to celebrate PEACE by using the word or symbol on a holiday card. I decide to use both.

This is one of those cards that sort of evolved as I was creating it. I sat down to create but really had no idea where I was going with it. In the end I created a PEACE symbol by cutting up an image of the earth. I separated the bits, leaving a gap between the pieces in order to create the peace symbol. I layered them behind a circle frame and printed the sentiment above the circle opening. I finished by adding the snowmen and snow at the base.

Wednesday, May 21, 2014

May Sketch~Second Card

This is my second card for our fabulous May sketch at The Sketch File. Kathy has us thinking about oval layers and I had a blast coming up with the theme for this card. I handcut a moon from light yellow cardstock and added yellow chalk to create a bit of dimension and shading. The stars were left over from a previous project. I just added a bit of wire around the largest star and layered all the stars in the lower right hand corner. Behind the moon I added oval layers and used a punch to create a star border in the dark blue layer.

I enjoyed working with the sketch and think you will too. I can't wait to see what you create.  If you need more inspiration, you can hop on over to the The Sketch File to see Kathy's gorgeous card as well as another version of the sketch.

Saturday, May 17, 2014

Floral Card in a Box

This is one of several Cards in a Box that I've created over the past few months. They are fun to create and each one ends up being unique. If you'd like to visit Frenchie at Stamp & Scrap with Frenchie, she has a fabulous tutorial. They are really quite simple to create once you have all the measurements. Although this one turned out nicely, I am itching to create another that doesn't have a floral theme. I've created two others with a floral theme and one with balloons, but it's time to consider some other options.

Thanks for stopping by the blog! 

Hope you enjoy your weekend!

Tuesday, May 13, 2014

OVAL LAYERS

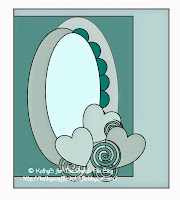
Kathy has launched the new May Sketch at The Sketch File. It's a beauty and one I hope you will enjoy using it as much as I did. This time we're playing with oval layers.

Honestly, I really wanted to just recreate her sketch with the lovely hearts at the base. It's so, so appealing! Instead I went with a floral theme and decided to keep my color palette simple, using only three colors (red, white and green). I layered a white scallop edged oval and two red ovals over a white floral embossed mat and adhered them to red cardbase. To add bit more texture, I embossed the top, red, oval layer with small dots. The flowers at the base of the ovals are the same floral images that I used on the white embossed mat. I embossed the floral images on red and white cardstock and cut around each flower, layering the red over the white. Since my images are flowers, I used leaves instead of swirls, adding an embossed line down the center of each and folding them slightly to add a bit of dimension.

So, are you inspired and ready to be creative? I hope you will take a few minutes to play with the sketch then link up your creation with us. See you at The Sketch File!

Saturday, May 3, 2014

More Layers

My final card for the Three or More Layers challenge at Jingle Belles is this multi-layered tree card. I think this one will need additional postage...it's a bit heavy! I started by cutting a rectangular piece of white cardstock into pieces and adhering the pieces in mosaic fashion to a black cardstock mat. I added a second green mosaic pattern on top of the white, then a red mosaic on top of that one. Before adhering the red onto the green, I punched stars randomly through each piece. Using green cardstock, I cut out pieces to create a tree shape, adhered them in layers, wrapped the tree with wire, adhered punched stars and added a black mat.

Supplies: Cardbase: Recollections, Carstock: Recollections, Bazzill, Star Punch, Craft wire, Star button, Scotch ATG, Scotch Quick Dry Adhesive.

Multi-Layered Revisited

This is my second card for the multi-layered (at least 3 layers) challenge at Jingle Belles. This card simply has layered stars, some single layered, others with two layers, all adhered to a green mat. I used a star shaped punch to add a few more stars to the mat, then backed the green mat with a white mat. I wrapped all the layers with a bit of green wire and added a strip of stars along the left edge. The good news is that this card came together quickly because the stars were already die cut and sitting on my craft table. They were left overs from another project.

Supplies: Cardbase: Bazzill, Cardstock: Bazzill, small star punch, Scotch ATG, GoCrafts dies, Imaginations Paper Crimper, Darice Embossing folder, Craft wire

Multi-Layered

I am one of those people that struggle with multi-layered cards. I find that I am never happy with my many layers once I start layering them on. However, since the challenge at Jingle Belles is to use at least three layers on our cards, I just had to give it a shot (make that several shots). This is the first of three cards that I've created. For this card, I started by stamping the tree image on white cardstock. To add a bit of interest, I cut it into unequal thirds and punched small holes in each. I layered the white cardstock onto red. I love how the red dots stand out against the white cardstock. I also added two additional layers by including both a green and red mat. Stay tuned for yet another post with my second card.

Supplies: Cardbase: Bazzill, Cardstock: Bazzill, DCWV, small hole punch, Hampton Arts Tree Stamp, Offray ribbon, Scotch ATG.