Friday, May 31, 2013

Ribbon Patches

I've rolled out the ribbon for the current RIBBON challenge over at Jingle Belles. I am so happy to finally have a project or two that inspires me to use some of my Christmas ribbon. It's the extra wide (1 3/8") and perfect for cutting into square patches! These little patches of ribbon stacked neatly into the shape of a tree.  I layered them on a piece of green embossed cardstock that I matted on white, then black.  I added a strip of white ribbon and a bow to finish.

Supplies: Cardbase: Recollections, Cardstock: Recollections, Ribbon: Offray, Reliant Ribbon Corp., Adhesive: Scotch ATG, Darice Embossing Folder.

Ribbon Tree

Today's card was inspired by the RIBBON challenge at Jingle Belles. I decided to use ribbon three ways on this card. First, I used it to create the tree. I have a collection of wide Christmas ribbon which I trimmed into narrow strips of various lengths. Then I adhered them into the shape of a tree.  I also cut triangles from the wide cream colored ribbon to use in the corners.  Finally I used ribbon to tie a bow for the upper left hand corner.

Supplies: Cardbase: Bazzill, Cardstock: Recollections,Red & Black Ribbon: Offray, Cream Ribbon: Reliant Ribbon Corp, Adhesive: Scotch ATG

More Birthday Inspiration

If you read my previous post, you might have noticed that I am using the same curved "Happy Birthday to You" sentiment that I used on that card. I had printed the sentiment a few times on a white pieces of cardstock and then attempted to cut it to fit that card. This was one of the first cuts and it wasn't exactly what I wanted so I set it aside. This morning I found it still sitting on my craft table, so instead of tossing it out, I decided to create a second birthday card. I inked it to represent a rainbow then layered it onto a black tag. The ribbons, bow and dots added a bit more detail and then I mounted the tag onto a piece of embossed yellow cardstock.

Supplies:
Cardbase: Recollections, Cardstock: Recollections, Ink: Studio G, MS Word, Sakura Gel Pen, Darice Embossing Folder, Offray Ribbon, Scotch ATG adhesive.

Happy Birthday


Ardyth Percy-Robb's card
I'm a a few days late in joining the birthday party for Ardyth Percy-Robb but I truly want to wish her the very best. I am always impressed and inspired by her CAS style! In fact, I used one of her "Thinking of You" card as inspiration for this birthday card.

So, HAPPY BIRTHDAY, Ardyth!  I love your CAS style and your beautifully designed masterpieces!

If you'd like to wish Ardyth a Happy Birthday, link up a card with Darnell at djkardkreations. Darnell has organized a "surprise" birthday party for Ardyth. 

Monday, May 27, 2013

Christmas Lights: All Tied Up


This month 52 (Christmas) Card Throwdown and Winter Wonderland share the same embellishment theme. It's TWINE (and/or ribbon at Winter Wonderland)!   So, for my card I used twine as one of the focal points and a string of Christmas lights as the other focal point. I've had this strip of stickers with Christmas lights for a very long time. To brighten the lights, I  began by applying glitter over the lights, then adhered twine to represent the electrical cord. I trimmed around the lights and cord and "draped" the lights through punched pine boughs that I inked. The white cardstock mat was a bit flat, so I inked around the edges and rounded the corners with a punch. To tie things up,  I added three layers of twine and a twine bow.


Supplies: Cardbase: Bazzill, Cardstock: Recollections, Twine: The Twinery, Stickers: Current, Glitter: Studio G, Punch: Martha Stewart, Creative Memories, Ink: Memento, Adhesive: Scotch ATG

Friday, May 24, 2013

Flower Garden


If you follow the challenges at the Muse Card Club, you'll know that there is a fabulous inspirational card created by Marion Vagg. I decided to play along with the challenge to see how Marion's card inspired me in my card making. I loved the colors and the variety of flowers that she used. Using similar colors and flowers of different sizes, I created my own little garden, but I added more flowers than in the inspirational card. I also added a bit of torn brown cardstock to represent soil. I mounted my garden on a turquoise cardbase instead of a yellow one and left off the sentiment and the washi tape.

Supplies: Cardbase: Bazzill, Cardstock: Recollections, Core'dinations: Punches: Stampin' Up, EK Success, Markers: Bic Mark It, Glitter glue: Stuido G, Adhesive: Scotch Quick Dry, Scotch ATG, Ink: Memento


Tuesday, May 21, 2013

Father's Day Card


My current card focus is Father's Day. For this multi-layered card, I used markers and colored pencils to draw a tree on a small piece of cardstock. I trimmed around the cardstock and inked the edges with brown ink. After tearing the bottom edge off a piece of brown cardstock, I layered the tree on it. The next layer is a brick embossed background, which was also inked with brown ink. The embossed layered was adhered to a piece of chocolate brown cardstock and then attached to the cardbase. I printed the sentiment on with MS Word and trimmed it to represent a banner.

Just for fun, I am linking this up with Old Back Porch. It's a great place to link up what you are currently working on and to get inspiration from others.

Supplies: Cardbase: Recollections, Cardstock: Core'dinations, Recollections: Kraft, Embossing Folder: Darice, Markers: Bic Mark It, Colored Pencils: Crayola, Ink: Memento, Adhesive: Scotch ATG

Saturday, May 18, 2013

O Christmas Tree


It's another Christmas card! I've lost count of how many cards I've already completed, but I know that I'm well into the fifties and it's only May....yippee. This particular card is for the current "Oh Christmas Tree" challenge at Winter Wonderland. To create the tree for my card, I backed heart shaped metal clips with two shades of green cardstock, added a trunk to each and adhered them to Kraft cardstock in a tree shape.  I inked around the edges of the Kraft, rounded the corners and used a gel pen to add white dots. Next I used an embossed cardstock as a mat and adhered these layers to a larger piece of Kraft. The text on this larger piece of Kraft is a series of random "Christmas" words that I came up with and printed directly to the cardstock using MS Word.  A touch of ribbon was added before adhering everything to the white cardbase.

Supplies: Cardbase: Recollections, Cardstock: Recollections, Bazzill, K & Company, Metal clips?, Ribbon: Offray, Sakura Gel Pen, Adhesive: Scotch Quick Dry, Scotch ATG

Thursday, May 16, 2013

Santa Hat: Ho, Ho, Ho

RED & WHITE is the May color challenge over at 52 Christmas Card Throwdown. When I think of Christmas and the colors red and white, Santa is among the top images. So with red cardstock in hand, I folded it in half to create a cardbase and hand cut a Santa hat shape from it.  I added some polyfil to represent the fur and hand cut the Ho Ho Ho. It seemed a bit flat so I attached the three red bows. Next I cut a white cardstock base, also in the shape of the Santa hat and printed Merry Christmas on it before adhering it to the inside.

Just for fun, I'm also linking this up over at Old Back Porch. It's a great place to post whatever you are currently working on.

Supplies: Cardbase: Fox River Company, Polyfil, Cardstock: white scraps, Adhesive: Scotch ATG, Scotch Quick Dry


Wednesday, May 15, 2013

Forgetful

This is one of those cards that I created for a challenge and then forgot to post. I have done this quite often lately.  I wonder what's up with that?  Anyway, it's based on a sketch challenge at Seize the Birthday. I used a die and felt to create that little owl. I love adding a little handmade vest to this owl die. It gives the owl a bit of a personality. The patterned paper was a piece from my scrap stash. I think it's MME.   I tore it and inked the edges then added a branch that I also tore from cardstock. 
Just for the fun of it, I'll link this card up over at Old Back Porch.

Supplies: Cardbase: Recollections, Patterned Paper: MME, Ink: Memento, Die: Spellbinders, Vest: Handmade, Leaf Punch: ?, Felt, Adhesive: Scotch ATG, Stamp: Stampin' Up


Monday, May 13, 2013

Two More for My Christmas Collection


My Christmas card box is filling up quickly
thanks to challenges like those at 52 Christmas Card Throwdown. I decided not to link up my cards this week, but thought I'd share them anyway. Honestly, I wasn't happy with the results on either card, but of course, my husband liked them both. We often have different reactions to my cards.  Anyway, both of these cards are based on the May sketch at 52 Christmas Card Throwdown.


Sunday, May 12, 2013

Merry and Bright Ornaments

Here's another Merry & Bright card for the Jingle Belles challenge. For this card I hand cut the three ornaments from white cardstock, layered strips of metallic paper across each at a diagonal, then used glitter glue between each strip. I added punched boughs and gold thread bows. I layered the ornaments on a piece of crimped cardstock and added a sentiment with two tiny gold brads.

Supplies: Cardbase: Recollections, Cardstock: Recollections, Metallic Foil Paper: Hygloss, Glitter Glue:  Horizon, Paper Crimper: Marvy Uchida, Adhesive: Scotch ATG, Scotch Quick Dry, Scrapbook Adhesives 3D Foam Squares, Embroidery Thread (DMC?), Punch: Martha Stewart

Friday, May 10, 2013

Metallic & Bright


Inspirational Photo from Jingle Belles  
I created this card for the Merry & BRIGHT  challenge at  Jingle Belles. I used scrap pieces of metallic paper and adhered them to a piece of cardstock, then I hand cut a Christmas tree and stitched it on my sewing machine. I punched wholes to represent lights then layered the tree on a piece of orange metallic paper and then onto a piece of embossed cardstock. Next I matted it on a blue metallic piece of paper. I couldn't decide whether to include a sentiment on the front of this card. So, I've temporarily attached "Merry Christmas" on the top card. Hopefully you can help me decide.

I'm also linking this card up at Old Back Porch. It isn't for a challenge. Instead, it's just for fun. We are encouraged to link up current projects to share our creativity and be inspired by others.
Supplies: Cardbase: Recollections, Metallic Paper: Hygloss, Embossing Folder: Darice, Cardstock: Recollections, Janome Sewing Machine, Adhesive: Scotch ATG

Penguin Wishes


The current card challenge over at Winter Wonderland is all about penguins. So, I created a series of handmade penguins from black and white cardstock, then dressed them with handmade hats and bows. My bows all came out slightly different, as they are tiny and difficult to cut. For the faces, I used a marker and then cut tiny orange beaks from orange cardstock.  I used a "sun" punch and altered it to create the feet. The snow that the penguins stand in was created by tearing white cardstock and adhering it in layers. For the cardbase, I used a fold that I recently saw Darlene at Darlene Design use (thanks for the inspiration, Darlene).

I will also linking this card up over at the  Old Back Porch where many crafters link up just to share their current creations. It's a great place to get a lot of inspiration.

I hope you enjoyed your visit today and will visit often. Thanks for stopping by.

Supplies:
Cardstock: MME, Scraps of cardstock: black, white, red, orange, Adhesive: Scotch ATG, Scotch Quick Dry, Hats: Acrylic Paint: Master's Touch, Punch: EK Success

Wednesday, May 8, 2013

Inspired by Darlene

Special Fold Owls
I was reading the posts in my blog reading list this morning and was working my way backwards through the Darlene Design blog, when I came across a very intriguing card that Darlene created.  She called it Split Owls.  (If you haven't visited her blog yet. I encourage you to do so. She is soooooooooo talented and shares her talent through video tutorials.)

When I saw Darlene creating her owl card, I was hooked and immediately went off to create my own version of her card. I started by die cutting five owls from chocolate cardstock. Then I hand cut little vests from scrap pieces of cardstock and used a gel pen to add detail before adhering them to each owl. I punched white and black circles and adhered them to each owl to represent the eyes. Then I took a tiny bit of orange and cut very tiny beaks.  In Darlene's version, she stamped a branch. I was tempted to draw a branch since I didn't have a stamp, but instead I used chocolate cardstock and tore it into the shape of a branch. I adhered the owls and branches to the card then added the punched leaves. I printed a sentiment and cut it into a dialogue bubble. I punched a circle to represent a  full moon and added it to the top of the card. Next I inked some of the edges and across the moon.

Thanks to Darlene for inspiring my card!

Supplies:
Cardbase: Stampin' Up, Cardstock: Core'dinations (chocolate and vanilla), Scraps from my stash, Owl Die: Spellbinders, Circle Punches: EK Success, Leaf Punch: ? (no name on it), Ink: Memento, Adhesives: Scotch Quick Dry and Scotch ATG

Tuesday, May 7, 2013

Welcome Little One "Blanket"


Turquoise, yellow and coral are the colors for the May Cards Challenge at the CREATE: Blog.
After taking photo after photo of this card, I finally settled on this one. It still doesn't show the true colors of the card. I wish you could see the card in person because the yellow is more vibrant and the coral and turquoise are a bit softer...oh well.  I began by embossing the turquoise and coral cardstock using two different embossing folders. I thought the embossing would add texture and make my "blanket" look more realistic.  I punched six squares from each color and adhered them to the yellow cardbase using just a bit of adhesive in the center of each square. I knew I was going to stitch around each square with my sewing machine and I didn't want the adhesive to end up on my needle.  Next I punched the stars and rabbits and adhered them to each square. Using a word document, I printed my sentiment and then cut around it to create a banner. I wanted a bit more dimension so I fringed the right and left edges of the cardbase. I think this was a good choice because it gave the "blanket" a more realistic look.

Supplies:
Cardstock: Core'dinations, DCWV, Punches: Square: EK Success, Star: McGill, Rabbit: Carl, Sewing Machine: Janome, Adhesive: Scotch ATG

A Smokey Take on Cascading Circles


Kathy has the May Sketch up over at The Sketch File!  I used it to create this card. It's a fun sketch and I hope you will visit the blog to see what the other DT members have created.  It's a month long challenge so you have plenty of time to join us.                                                                                          

For my card I decided to use a train. Those cascading circles on the sketch suggested train smoke, so I went for it. I hand cut a train and train car and layered them on an embossed piece of white cardstock. I embossed the white cardstock with gears on the bottom and chevrons on the top. Next I  cut a strip of black cardstock and then used an Xacto knife to cut vertical lines in it. I then threaded a ribbon through it and trimmed the edges in a banner shape. To create the smoke pouring from the smoke stack, I punched a series of circles and chalked them.  I finished by writing Happy Birthday and cutting into a banner.   I'm thinking about other ways to interpret Kathy's sketch....how about you? We'd love to see what you come up with for this sketch challenge.                                                                                                                                                                                                                                                                         
Supplies: Cardbase: DCWV, Cardstock: Recollections and scraps from my stash, Embossing Folders: Darice, Circle Punches: EK Success, Chalk: Craf-T Products, Adhesive: Scotch ATG, Ribbon: Offray 

Hexagon

This card is for the current  challenge at CASology.  The current cue card is HEXAGON. I began by 
printing a large hexagon image from the internet then used it as a template to cut the cardbase. Fortunately, I have a hexagon die that fit inside this hexagon. So I cut a smaller hexagon from a cream colored cardstock. On this cream cardstock, I stamped bulrushes with brown ink. I used a marker  and white colored pencil to shade the center of each bulrush. I printed the sentiment on a smaller piece of the cream cardstock and layered it on a piece of brown cardstock, trimming the edges to match the hexagon.  I adhered all layers to the cardbase and added a cream hexagon inside for a writing surface.

Supplies:
Cardstock: Core'dinations, vanilla cream and chocolate, Stamp: Market Street Stamps: Growth, Marker: Bic Mark It, Colored Pencil: Crayola,Die: Spellbinders, Adhesive: Scotch ATG, Ink: Memento


Monday, May 6, 2013

Measure of a Dad

IMG_8688
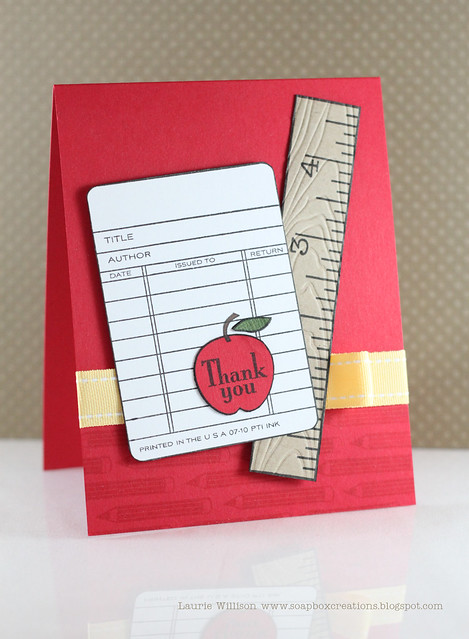
Created by LAURIE WILLISON
 for MUSE challenge
Have you seen the latest inspiration over at the MUSE Card Club? There is a fabulous card by Laurie Willison. She created a thank you card for a teacher. I wanted my card to have a "RULER" embellishment too. I immediately thought about Father's Day and my tape measure Washi tape. I figured this would be perfect to represent the ruler in Laurie's card.  I began by adhering two strips of the Washi strips of black cardstock. I then attached the strips to a piece of green cardstock that I embossed with a chevron pattern. I rounded the corners and then located a piece of patterned paper to represent the "check-out card" that Laurie used.  I used my notebook edge punch to give it that notebook feel and then used a word document to print a series of words that describe my husband. I inserted the phrase "NO ONE MEASURES UP TO YOU" at a slight angle and then printed the list onto the patterned paper. I adhered the list to a piece of black cardstock then attached it to the green cardstock at an angle, like Laurie did.  Next I used some metallic "stainless steel" sticky back paper to create a tape measure. I looked at one of my husband's tape measures and then hand cut my version of it. I used a piece of recycled #6 plastic to represent the tape coming out of the tape measure. I layered this over the "NO ONE MEASURES UP TO YOU" sentiment and added a piece of the metallic paper to represent the pull tab on the tape measure. I attached the green panel to a cream colored cardbase with rounded corners.

Supplies:
Cardbase: Recollections, Green Cardstock: Bazzill, Patterned Cardstock: Echo Park: For the Record, MS Word, Metallic Paper (from my scrap stash), #6 Clear recycled plastic, Washi Tape: Darice, Adhesive: Scotch ATG, Elmer's Glue Spots

Sunday, May 5, 2013

Candle Shaped Card

The idea for this card popped into my head in the wee hours of the morning. This often happens to me and I must get up at once and go work on the idea. I had seen the "Shaped Cards" challenge over at Christmas Card Challenges before going to bed last night. I  was thinking about this challenge as I drifted off to sleep and awoke eager to put the card together.

I began by hand cutting three candles from red cardstock. I don't draw the image first. I just cut out the image I want  because if I try to draw an image, I struggle with it, but give me a pair of scissors and I can usually cut out exactly what I had in mind. Anyway, I cut two candles the same height and cut the third one taller and slightly wider.  Next I used chalk and Luster Rub-Ons to give the candles dimension and detail. I hand cut the flames from a piece of cardstock that I inked with yellow, orange and red ink overlapping the inks to create a flame color. I attached the flames then drew in the wicks with a black marker.  Before adhering the candles to the cardbase, I hand cut a silver plate and attached it to the bottom of the cardbase. I attached each candle using dimensional adhesive down the center and double sided tape on the right and left edges of each candle.  This gave the candles the dimension and roundness I was looking for.  I added punched, inked holly leaves and three red pearls to represent the holly berries.  To shape the card, I fussy cut around the candles. I wanted to be sure that the flames would remain attached to the candles so I adhered a transparent circle behind each candle flame.

Supplies:
Cardbase: Recollections, Cardstock: Recollections (red), Bazzill (green), Ink: Studio G, Chalk: Craf-T Products, Luster Rub-Ons: Craf-t Products, Transparent plastic: # 6 plastic (recycled), Holly Punch: Emaginations, Circle Punches: EK Success, Pearls: Queen & Co, Adhesives: Scotch ATG, Scrapbook Adhesives 3D Foam Squares, Stainless steel foil (scrap stash)

I appreciate your visit. 
Hope you'll stop by again.

Friday, May 3, 2013

Santa Hats

This is for the punched element challenge at 52 Christmas Card Throwdown. I'll write more later....

Earlier I tried to post this for the 52 Christmas Card Throwdown challenge but the Inklz closed just as I was selecting my image....oh well.

I used punched hats and adhered them in the shape of a tree. I also used a punched Santa for the tree trunk and an punched star.  I layered all the pieces on an embossed background and added a strip of decorative tape to the bottom.  I painted on the white pom poms and fur for each little hat and Santa's outfit.

Supplies:
Cardbase: Recollections, Cardstock: Recollections, We Are Memory Keepers Washi Tape, Santa and Hat Punch: All Night Media, Darice Embossing Folder, Acrylic Paint: Master's Touch

Thursday, May 2, 2013

PEACE on Earth

Jingle Belles is celebrating holiday things that fly. So, I dug out my acrylic paints and painted a dove then fussy cut around it. I handcut the letters for the word peace, placed them on top of a piece of dark blue cardstock, then cut away part of the blue cardstock.  Using a bit of blue ink, I inked around the edges of the letters then adhered them to the edges of the blue pieces of cardstock. I attached the dove with dimensional adhesive and used dimensional adhesive to attach the blue cardstock pieces. Next I added the punched leaves. Next I used a gel pen to finish the sentiment added faux stitch lines around the outer edges of the card.

I'm also linking this card up over at Crimbo-Crackers where the current challenge is "Anything Goes" as long as it's Christmas or Festive.

Supplies:
Cardbase: Recollections, Cardstock: Fox River Co, scraps of white cardstock, Ink: Studio G, Gel Pen: Sakura, Acrylic Paints: Master's Touch, Punch: McGill, Adhesive: Scrapbook Adhesives 3D Foam Squares, Scotch ATG.

Wednesday, May 1, 2013

Season's Greetings


I saw the punched embellishment challenge over at 52 Christmas Card Throwdown, so I grabbed my pine cone punch and punched three pine cones. To add dimension I punched small circles from the same brown cardstock that I had used for the pine cones. Next I layered and adhered the small circles over the punched cone image. Once the adhesive was dry, I used a brown ink pad and brushed it across the pine cones. This added some dimension but not quite enough. I ended up adhering the cones to the cardbase with dimensional adhesive. This achieved the look I wanted. Then I punched pine boughs and adhered them above the cones. To make the cones pop, I added the bright red ribbon and finished by writing the sentiment.    Sorry about the quality of the photo. I was hoping to get a better photo, but the sun isn't making an appearance today. Believe it or not we are under a winter storm warning and  already have several inches of SPRING snow. It doesn't look at all like spring out there!
This is a photo of the pine cone before I added the small circles. It looked so very flat even though the cardstock was textured.


Thanks for stopping by!

Supplies:
Cardbase: Recollections, Cardstock: Coredinations, Pine Cone Punch: Emagination, Circle Hand Punch, Pine Bough Punch: Martha Stewart, Ink: Memento Rich Cocoa, Ribbon: Offray, Adhesive: Scotch Quick Dry, Scotch ATG

Inked and Textured Background

Inspiration for this card came from the current challenge over at FUSION CARD CHALLENGE.  For each challenge we can create a card based on a sketch, a photo or both.  I decided to use a little each.  After embossing a piece of white cardstock, I used inks that were the same color as the flowers in the inspirational photo and inked the background.  From the sketch, I borrowed the layout and used a scalloped circle die to make a partial cut in the inked, embossed background. I layered this on a piece of black embossed cardstock, adding strips of Washi tape and a sentiment. To finish I layered a flower and added an orange pearl center.

I am also submitting this card for the "Anything Goes" challenge at Celebrate the Occasion and the "Make and Impression" challenge at Catered Crop.

Supplies:
Cardbase: Recollections, Cardstock:Recollections, Darice Embossing Folder, Studio G Ink, Sakura Gel Pen, McGill Flower Punch, Queen & Co Pearl, Scotch ATG Adhesive, Elmer's Glue Spots, Die: Fiskars Fuse